 ultimate-guide
Why Professional Epoxy Lasts Longer: A 2026 Guide
Table of Contents
- Why Professional Epoxy Lasts Longer: The Real Difference
- Professional Concrete Floor Preparation: The Step That Decides Everything
- DIY vs Professional Epoxy Flooring: Material Quality and Application Methods
- Chemical Composition: Why 100% Solids Epoxy Outperforms Big-Box Kits
- How Environmental Conditions During Curing Affect Longevity
- Epoxy Floor Coating Installation Cost: What You're Actually Paying For
- The Long-Term Cost-Benefit of Professional Installation
- Conclusion
- Frequently Asked Questions
Last Updated: October 4, 2026
Why Professional Epoxy Lasts Longer: The Real Difference
Professional epoxy lasts longer because the outcome depends less on the coating itself and more on what happens before it is poured. Surface preparation, substrate condition, and material quality decide whether a floor survives a decade or peels within two winters.
At Valley Floor Coatings, we see the same pattern repeatedly: a homeowner applies a big-box kit, it looks sharp for one season, then it fails. Why professional epoxy lasts longer comes down to decisions most DIY kits skip entirely.
Here is the part most guides get wrong. They treat epoxy as a paint problem. It is not.
What DIY Kits Get Wrong
Retail epoxy kits are built for convenience, not longevity. They typically include a thin coating, a limited hardener ratio, and instructions that assume a clean, dry, ready-to-coat slab.
The real world rarely cooperates. Concrete is porous. It holds moisture, oils, and dust. A kit that skips mechanical grinding leaves those contaminants in place, and the coating sits on top of them rather than bonding to the concrete.
Professional Concrete Floor Preparation: The Step That Decides Everything
Preparation is the single biggest reason professional epoxy lasts longer. A professional crew profiles the concrete, tests for moisture, and repairs cracks before any resin touches the floor.
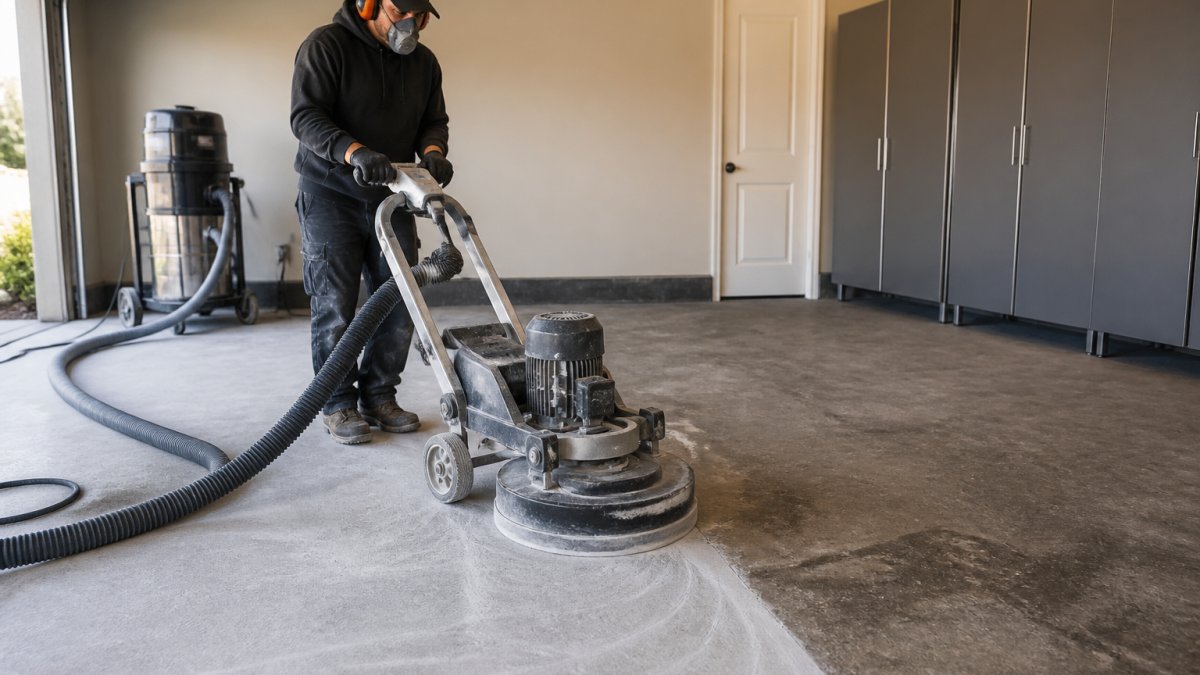
Mechanical grinding creates a rough, open profile that gives the epoxy something to grip. Acid etching, common in DIY instructions, is inconsistent and often leaves residue that weakens bond strength.
Moisture Testing and Substrate Analysis
Moisture vapor transmission is the silent killer of epoxy floors. Concrete slabs release water vapor from below, and if that vapor has nowhere to go, it pushes up through the coating.
Professionals test for moisture before installation. When readings are high, the fix is a moisture barrier or primer coat designed to manage vapor. Skipping this step is why so many floors blister and delaminate.
DIY vs Professional Epoxy Flooring: Material Quality and Application Methods
The material gap between DIY kits and professional systems is enormous. Professional installations use 100% solids epoxy, which means the product contains no solvents to evaporate during curing.
That matters for thickness and strength. A 100% solids epoxy cures into a denser film with higher tensile strength and abrasion resistance. Big-box kits often contain solvents and fillers that thin the coating and reduce its durability.
| Factor | DIY Kit | Professional System |
|---|---|---|
| Solids content | Solvent-based, thinner film | 100% solids epoxy |
| Surface prep | Acid etch or none | Mechanical grinding |
| Moisture testing | Rarely included | Standard practice |
| Topcoat | Often omitted | Polyaspartic or urethane |
| Expected lifespan | A few years | A decade or more |
Application method matters just as much. Mixing ratios, pot life, and recoat windows all affect how the epoxy cures. Get the timing wrong and the floor never reaches full hardness.
Chemical Composition: Why 100% Solids Epoxy Outperforms Big-Box Kits
The chemistry behind professional epoxy explains its longevity, and it is the topic most guides reduce to a single sentence. The difference between a big-box kit and a professional system is not marketing. It is the molecular structure of the cured film, and that structure is determined by what is in the bucket before the resin and hardener are mixed.
The Three Families of Epoxy Coating
Epoxy flooring products fall into three broad categories, and the category determines the film's thickness, strength, and lifespan.
- Water-based epoxy. Water is the carrier. As the coating cures, the water evaporates and the resin particles coalesce into a film. Water-based products are low-odor, fast-drying, and easy to apply, which is why they dominate the retail shelf. The trade-off is film build. A water-based epoxy typically cures to a thin film, often in the 2 to 5 mil range per coat, and because the film is thin, it has less resistance to abrasion, impact, and chemical attack. It also tends to have lower cross-link density, which means it yellows faster under UV exposure.
- Solvent-based epoxy. Solvent is the carrier instead of water. These products penetrate better and cure to a slightly thicker film than water-based, but the solvent has to evaporate, which means the film shrinks as it cures. Shrinkage creates internal stress and can lead to hairline cracks or reduced adhesion over time. Solvent-based products also carry higher VOC levels and stronger odors, which limits their use in occupied spaces.
- 100% solids epoxy. There is no carrier to evaporate. Every component of the mixed product, resin, hardener, and any additives, becomes part of the cured film. Nothing leaves. That means the film builds to its full specified thickness in a single application, often 10 to 40 mils depending on the system, and the cured film is denser and more highly cross-linked than either water-based or solvent-based products.
Why Cross-Link Density Determines Durability
Epoxy cures through a chemical reaction between the resin and the hardener. The resin molecules and hardener molecules link together into a three-dimensional network, a cross-linked polymer. The density of that network is what gives the cured film its strength.
A highly cross-linked film has more chemical bonds per unit volume. That translates directly into:
- Higher tensile and compressive strength. The film resists deformation under load instead of stretching or cracking.
- Greater abrasion resistance. A denser network resists the mechanical wear of foot traffic, forklifts, and tire scrub.
- Better chemical resistance. A tight molecular network is harder for solvents, oils, and acids to penetrate. This is why 100% solids systems are specified in auto shops, restaurants, and industrial facilities where spills are routine.
- Resistance to hot tire pickup. Hot tires soften many coatings and pull them off the slab. A dense, highly cross-linked film resists that softening.
Big-box kits, by contrast, are often formulated with fillers and extenders to hit a price point. Those fillers dilute the resin and reduce cross-link density. The result is a film that looks fine when new but scuffs, yellows, and wears through far sooner than a 100% solids system.
The Trade-Offs Professionals Accept
100% solids epoxy is not easier to work with. It is harder. The trade-offs are real, and they are the reason DIY kits do not use it:
- Short pot life. Once the resin and hardener are mixed, the working time is limited, often 20 to 40 minutes depending on the formulation and temperature. A crew has to mix, pour, spread, and back-roll within that window. Miss it and the batch kicks in the bucket.
- Precise mixing ratios. 100% solids systems are typically mixed by volume or weight at exact ratios. A slight error in the hardener ratio leaves unreacted resin or unreacted hardener in the film, which produces a soft, tacky, or chemically weak cure.
- Temperature sensitivity. The reaction is exothermic and temperature-dependent. Cold slabs slow the cure; hot slabs accelerate it and can shorten pot life dramatically. Professionals check slab and ambient temperature before mixing.
- Higher material cost. The resin content is higher, so the product costs more per gallon. That cost is offset by the film thickness and service life, but it is a real upfront difference.
The Topcoat Question
A 100% solids epoxy base coat is the structural layer, but it is not the whole system. Most professional installations add a topcoat, commonly polyaspartic or polyurethane, for UV stability and gloss retention. Epoxy itself ambers under UV exposure, which is why a clear epoxy floor near a garage door or window will yellow over time.
The topcoat is not a substitute for a good base coat. It is an additional layer of protection on top of a properly cross-linked film. A cheap base coat with a good topcoat will still fail from underneath. A 100% solids base coat with a proper topcoat is the combination that delivers a decade or more of service life.
What This Means for Longevity
The reason professional epoxy lasts longer is not that professionals use a secret ingredient. It is that they use a product family, 100% solids epoxy, that cures into a denser, more highly cross-linked film, and they apply it with the mixing discipline and environmental control that the chemistry requires. A big-box kit is engineered for a homeowner to open, mix, and roll on a Saturday. A 100% solids system is engineered to survive a decade of traffic, chemicals, and thermal cycling. Those are different products with different chemistry, and the chemistry is why the lifespan differs.
How Environmental Conditions During Curing Affect Longevity
Temperature and humidity during curing decide how well epoxy performs. Epoxy needs a stable environment to cure properly, and the wrong conditions leave a floor that never fully hardens.
Cold slabs slow the reaction. High humidity can cause amine blush, a waxy film that prevents topcoats from bonding. Professionals control the environment, checking slab temperature and ambient conditions before and during application.
This is one of the angles most DIY guides ignore entirely. A kit applied on a cool, damp morning may look fine, but the cure is compromised from the start.
Epoxy Floor Coating Installation Cost: What You're Actually Paying For
The epoxy floor coating installation cost reflects more than materials. You are paying for preparation equipment, moisture testing, quality resin, and skilled application.
That is why comparing a kit price to a professional quote is misleading. The kit price covers a bucket of coating. The professional cost covers the labor and equipment that make the coating last.
Pricing depends on square footage, slab condition, and the system you choose. We provide free estimates so you know the full scope before work begins, with no surprise charges once the job starts.
The Long-Term Cost-Benefit of Professional Installation
The long-term math favors professional installation. A DIY floor that fails in two or three years means paying twice: once for the failed kit, again for removal and a proper job.
A professional epoxy floor spreads its cost across a much longer service life. Add lower maintenance, better chemical and impact resistance, and fewer repairs, and the annual cost drops well below the DIY path.
For auto shops, restaurants, warehouses, and retail spaces, that reliability matters more than the upfront number. A floor that survives oil, traffic, and cleaning chemicals pays for itself.
Conclusion
Choosing the wrong coating means repeating the same failure you are trying to escape. A floor that peels, yellows, or lifts costs you twice and disrupts your space both times.
Valley Floor Coatings handles professional concrete floor preparation, moisture testing, and application with 100% solids epoxy systems. We are licensed and insured, and we serve residential, commercial, and industrial clients across the Central Valley with free estimates.
Get started with Valley Floor Coatings and install a floor built to last.
Frequently Asked Questions
What is the difference between DIY epoxy kits and professional-grade coatings?
DIY kits typically use water-based or low-solids epoxy that cures thin and offers limited resistance to hot tires, chemicals, and abrasion. Professional-grade coatings use 100% solids epoxy, often with a polyaspartic topcoat, applied at 8-12 mils thick. The result is a floor that handles high-traffic commercial use, oil spills, and temperature swings without peeling or delaminating after a single winter.
How does surface preparation affect the lifespan of an epoxy floor?
Surface preparation determines whether epoxy bonds or peels. Professional installers use mechanical grinding or shot blasting to create a concrete profile that epoxy resin can grip, then test for moisture vapor transmission. Skipping these steps, as many DIYers do, leaves a smooth or contaminated surface. The coating adheres poorly, and peeling or delamination starts within months.
How long can you expect a professionally installed epoxy floor to last?
A professionally installed epoxy floor with proper substrate preparation and a quality topcoat lasts 10 to 20 years in residential settings and 5 to 10 years in heavy industrial environments. Lifespan depends on concrete condition, moisture levels, coating thickness, and maintenance. DIY kits often fail in 2 to 3 years because they skip moisture testing and surface profiling.
Why does professional epoxy resist peeling and cracking better than DIY alternatives?
Professional epoxy resists peeling because the installer controls every variable: substrate moisture, surface profile, mixing ratios, pot life, and curing temperature. DIY kits leave these to chance. A professional concrete floor preparation removes contaminants and creates the right anchor profile, while 100% solids epoxy and a polyaspartic topcoat add flexibility and UV stability that cheap kits lack.